
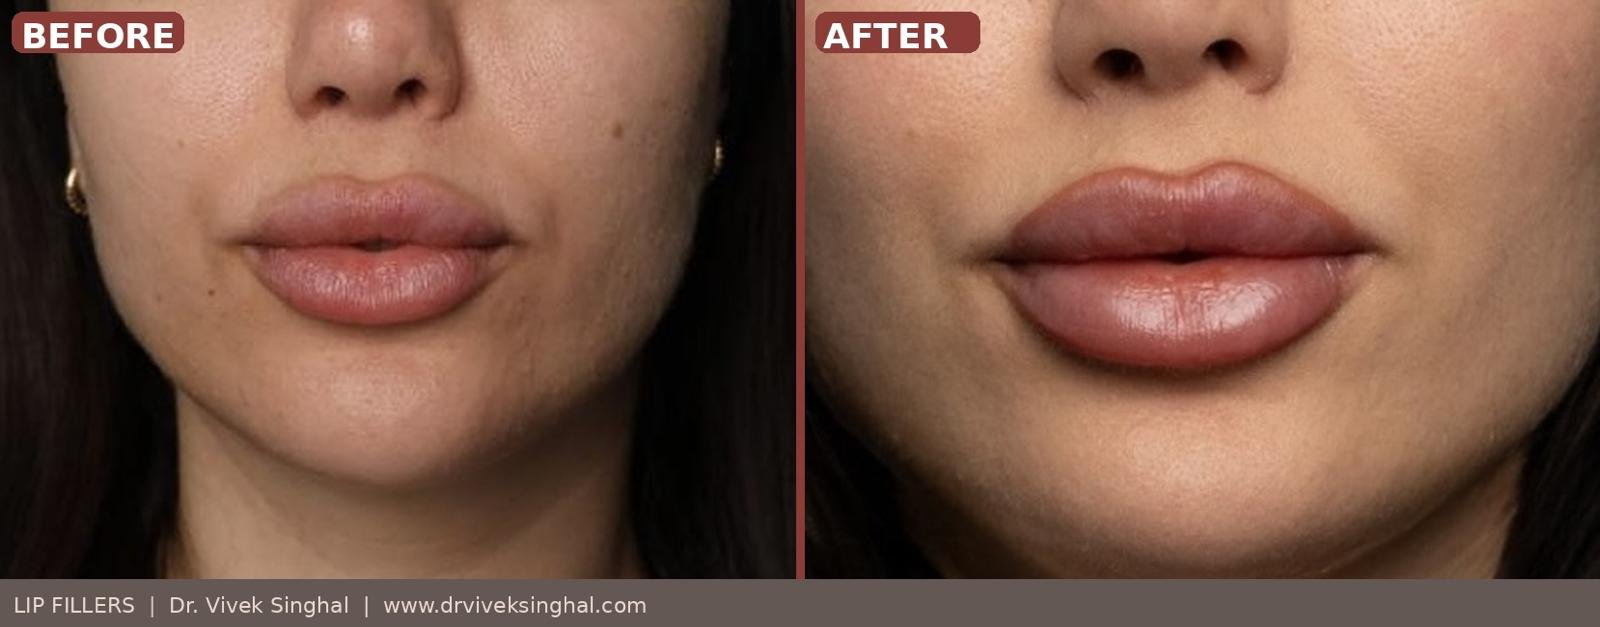
Lip fillers are among the most requested aesthetic treatments in the world – and among the most technically demanding to perform well. A natural-looking, well-proportioned result requires far more than simply injecting a syringe of product into the lips. It demands a clear understanding of lip anatomy, a considered approach to product selection, fluency with multiple injection techniques, and the experience to manage complications when they arise.
In this guide, Dr. Vivek Singhal covers everything patients need to know – from the styles and techniques available, to the honest realities of complications and how they are prevented and resolved.
Understanding Lip Anatomy: The Foundation of Everything
Before any injection, a thorough understanding of lip anatomy is essential. The lips are not a single structure – they are a complex arrangement of muscle, fat, mucosa, vermilion, dry skin and multiple distinct anatomical zones, each behaving differently when filler is introduced.
Key anatomical landmarks:
The vermilion border is the defined edge between the lip skin and the lip mucosa. Enhancing this border creates definition and the illusion of volume even with minimal product.
The Cupid’s bow is the double-peaked curve of the upper lip. Its shape, symmetry and projection are central to lip aesthetics.
The philtrum columns are the two ridges running from the nose to the Cupid’s bow peaks. Supporting these with filler lifts the central upper lip and enhances the Cupid’s bow definition.
The tubercles are the three natural projections of the upper lip (two lateral, one central) and two of the lower lip. Restoring or accentuating these creates a natural three-dimensional result.
The wet-dry border is the junction between the keratinised outer lip skin and the inner moist mucosa. Injecting at or near this border creates eversion (outward roll) and the appearance of fullness.
The orbicularis oris is the circular muscle surrounding the mouth. Its tone and movement must be considered – filler that conflicts with muscle anatomy migrates, distorts and looks unnatural over time.
Lip Filler Styles: What Are You Actually Asking For?
One of the most important conversations in a lip filler consultation is establishing what style of result the patient wants. The term “lip filler” encompasses a very wide range of aesthetic outcomes.
Natural Enhancement
The goal is to improve on what is already there – softening fine lines, adding subtle volume, improving symmetry and refreshing an ageing lip – without anyone noticing a procedure has been performed. This is the most technically demanding style because the margin between “looks better” and “looks done” is very small.
Defined and Projected
Focus on enhancing the vermilion border and Cupid’s bow to create a more defined, structured lip with clear edges. Volume may or may not be significantly increased – the emphasis is on shape and definition. This suits patients with naturally soft or undefined borders.
Full and Voluminous
A genuinely fuller lip with increased projection and volume, while maintaining anatomical proportions. This requires careful attention to the ratio between upper and lower lip (classically upper:lower = 1:1.6) and to the lateral lip body, which often needs volumising alongside the central projection to avoid an unnatural “duck” appearance.
Russian Lip / Doll Lip
A specific technique (covered in detail below) that creates a heart-shaped, flat-projecting lip with strong Cupid’s bow definition and a relatively flat side profile. Not anatomically natural for all patients – appropriate patient selection is essential.
Lip Flip (Botox-assisted)
Not technically a filler procedure, but commonly requested alongside it. Botox injected into the orbicularis oris along the upper lip border causes the muscle to relax and the lip to evert (roll outward), creating the appearance of a fuller upper lip without adding volume. Lasts 6 to 10 weeks. Best used as a complement to filler, not a substitute.
Injection Techniques: The How Behind the Result
Different techniques produce fundamentally different results. An experienced practitioner will select and combine techniques based on the specific anatomy and goal of each patient.
Linear Threading
The cannula or needle is advanced through the lip tissue and product is deposited in a continuous line as the instrument is withdrawn. Creates smooth, even volume distribution along the lip body. The workhorse technique for adding body to the lip.
Serial Puncture / Bolus
Small deposits of filler are placed at multiple points along the lip. Allows precise placement and control of volume in specific zones. Particularly useful for tubercle definition and vermilion border enhancement.
Vermilion Border Technique
Filler is placed precisely along the white roll (vermilion border) to define the lip edge. Very small quantities are used. Creates definition without significant volume – a key technique for the “defined but not overfilled” result.
Philtrum Column Support
Small boluses of filler placed at the base of the philtrum columns (the natural ridges above the Cupid’s bow) lift the central upper lip and enhance the Cupid’s bow peaks. Creates an elegant upward projection that reads as natural youth.
Russian Technique (Heart-Shaped / Vertical Projection)
The Russian technique focuses volume centrally and vertically rather than projecting the lip forward and outward. Product is placed in vertical columns from the base to the border of the lip, creating height in the central zone and a pronounced Cupid’s bow definition with a relatively flat side profile.
The result is distinctly different from a standard augmentation – the lip looks taller and more heart-shaped rather than fuller and more projected. It suits patients who want strong definition and a specific aesthetic, and suits certain facial proportions better than others.
Important note: The Russian technique requires precision placement in the correct tissue plane. Placed incorrectly, it carries a higher risk of vascular occlusion than standard techniques due to the injection points used. It should only be performed by practitioners with specific training and experience in this method.
Keystone Technique
Targets the central tubercle of the upper lip with a small bolus of firmer filler to create a defined central projection – the “keystone” of the Cupid’s bow structure. Combined with vermilion border work, this creates beautiful three-dimensional definition without excess volume.
Cannula vs Needle
Both instruments are used in lip augmentation. Cannulas (blunt-tipped, flexible instruments) are generally safer for the body of the lip – they displace rather than pierce vessels and produce less bruising. Needles allow more precise placement at the vermilion border and for specific bolus techniques. Most experienced practitioners use both in combination.
Filler Selection: Not All Lip Fillers Are Equal
Lip tissue is highly mobile, expressive and sensitive. The filler used must be soft enough to move naturally with the lip, yet cohesive enough to maintain shape and not migrate. This is a fundamentally different requirement from structural facial fillers.
Key properties for lip fillers:
Low to medium G’ prime (softness): The lip moves constantly – speaking, eating, kissing, expressing emotion. A stiff, high G’ filler in the lip body will feel hard, look unnatural and move abnormally. Lip fillers must be soft and pliable.
High cohesivity: Cohesivity refers to how well the gel holds together as a unit. A highly cohesive soft filler maintains its shape without spreading or migrating into surrounding tissue – critical in the lip where migration creates the dreaded “duck lip” or blurred border appearance.
Appropriate hydrophilicity: Hyaluronic acid attracts water. Very hydrophilic fillers can swell significantly in the lip over the first 24 to 48 hours – a property that must be factored into the initial injection volume to avoid over-correction.
Lidocaine content: Most modern lip fillers contain lidocaine (local anaesthetic) within the formulation, which significantly improves patient comfort during injection.
The selection of the appropriate product – including which product for the border versus the body of the lip – is a clinical decision that requires knowledge of the available options and their individual properties.
The Nuances That Separate Good Results from Great Ones
Technical skill and product knowledge are necessary but not sufficient. The following nuances are what distinguish truly excellent lip filler outcomes.
Facial proportion analysis before injection. The ideal lip does not exist in isolation. Its size, shape and projection must be proportionate to the nose, chin, philtrum length and overall facial structure. A lip that looks beautiful on one face can look excessive or incongruous on another. Dr. Vivek Singhal analyses the whole face before touching the lips.
Respecting the golden ratio. The classical aesthetic proportion of upper to lower lip is 1:1.6. The lower lip should be the dominant lip. Overfilling the upper lip beyond this ratio creates an unnatural, top-heavy appearance that is the hallmark of poorly planned augmentation.
Asymmetry is normal – and must be handled carefully. Very few patients have perfectly symmetrical lips, and attempting to create absolute symmetry with filler often produces an unnatural result. The goal is harmonious balance, not mathematical equality.
Less product, more technique. The most natural results typically use less product than patients expect — often 0.5 to 1ml for a first treatment. The result should look like the patient’s own lips, but better. Over-injection is the single most common cause of unnatural appearance.
The importance of undercorrection at first treatment. Filler can always be added. It cannot always be easily removed. For first-time patients, Dr. Vivek Singhal recommends starting conservatively, assessing the result at two weeks, and adding more if desired. This approach produces consistently better outcomes than attempting to reach the final result in one session.
Lip skin quality matters. Ageing lips with fine lines, loss of volume and reduced skin quality respond differently to filler than young, well-hydrated lips. The technique and product must adapt accordingly – and in some cases, skin quality treatments (skin boosters, resurfacing) should precede or accompany filler for the best result.
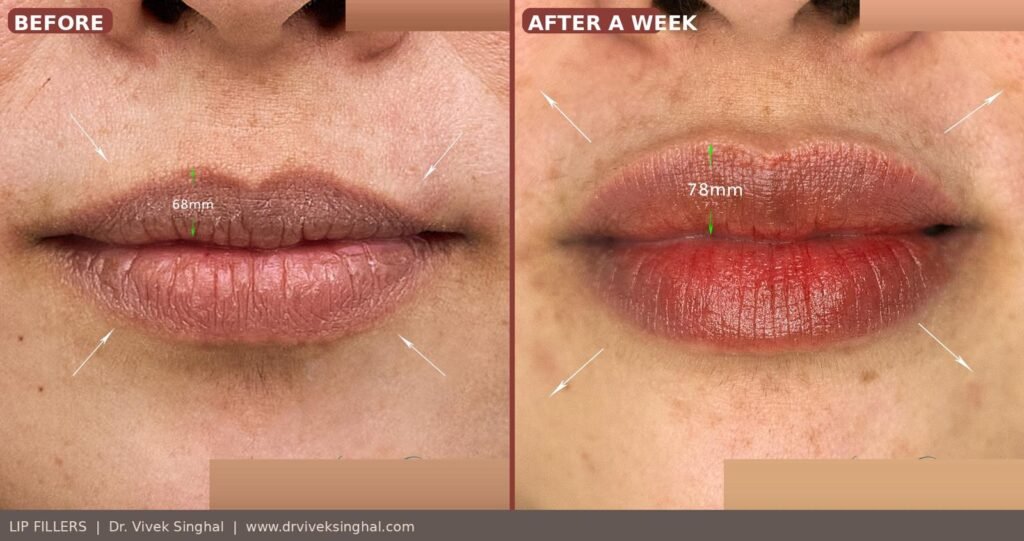
Swelling is not the result. Significant post-injection swelling is normal and can last 24 to 72 hours. Patients must be counselled not to judge the result until at least 2 weeks post-treatment. Many patients who panic about their lips immediately after treatment are delighted at 2 weeks.
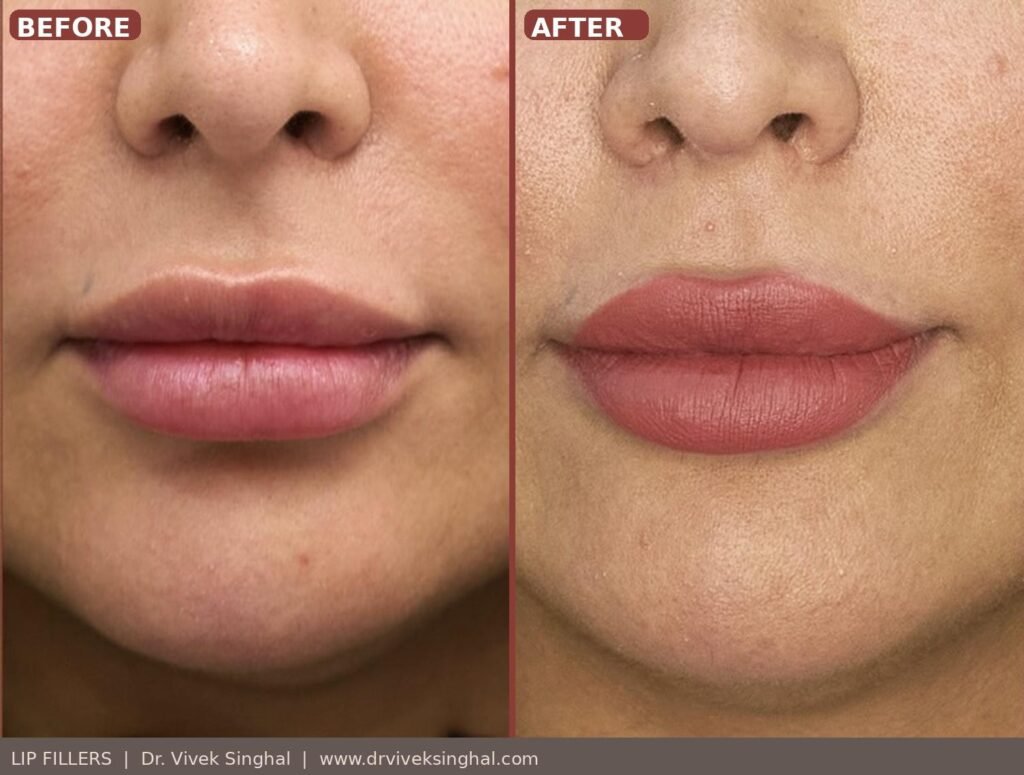
Real Patient Results: Before & After
Complications: The Honest Guide
Complications in lip filler are more common than in other facial areas. The lip is highly vascular, highly visible and highly mobile. Every practitioner offering this treatment must be able to recognise, manage and resolve complications. Here is an honest account of what can occur and how each is handled.
1. Bruising
How common: Very common – the lip is extremely vascular.
Why it happens: Needle or cannula trauma to small blood vessels.
Prevention: Use of cannulas where appropriate, slow injection technique, patient avoidance of blood-thinning medications (aspirin, ibuprofen, fish oil, alcohol) for 5 to 7 days before treatment.
Resolution: Bruising typically resolves within 5 to 10 days. Arnica (topical or oral) can accelerate resolution. Laser treatment (pulsed dye or KTP) can dramatically speed resolution for significant bruising.
2. Swelling
How common: Universal – all patients experience some swelling.
Why it happens: Trauma from injection combined with the hydrophilic nature of hyaluronic acid.
Prevention: Ice immediately post-treatment reduces initial swelling. Cannula use produces less swelling than needles. Conservative product volumes reduce the severity.
Resolution: Most swelling resolves within 24 to 72 hours. Residual firmness continues to soften over 2 weeks. Cold compresses in the first 24 hours, then warm compresses from day 3 onwards help. Antihistamines can help if swelling is significant.
3. Lumps and Irregularities
How common: Relatively common in the immediate post-treatment period; less common as a persistent issue.
Why it happens: Uneven product distribution, superficial placement, or product placed in the wrong tissue plane.
Prevention: Correct injection depth and technique, gentle massage immediately post-treatment in some cases, appropriate product selection (too stiff a product in the lip creates palpable lumps).
Resolution: Many early lumps resolve spontaneously as the filler integrates. Persistent lumps can be gently massaged. Lumps that do not resolve within 4 weeks can be dissolved with hyaluronidase applied precisely to the affected area.
4. Migration
How common: A significant concern, particularly with repeated treatments over time.
Why it happens: Filler placed superficially or in excess migrates into surrounding tissue with the movement of the orbicularis oris muscle. Over multiple treatment cycles, product can accumulate in the tissue above the vermilion border, creating the blurred, “duck lip” appearance associated with poorly performed augmentation.
Prevention: Correct placement depth (not superficial in the dermis), appropriate product selection (highly cohesive fillers resist migration), and conservative volumes. Avoiding overfilling is the single most important preventive measure.
Resolution: Migrated filler that has blurred the borders or created an unnatural appearance is dissolved with hyaluronidase. This is a well-established rescue procedure, but requires patience – sometimes multiple sessions are needed to fully dissolve accumulated product, particularly when it has been placed over multiple previous treatments.
5. Tyndall Effect (Bluish Discolouration)
How common: Uncommon but recognisable.
Why it happens: Filler placed too superficially (in the very upper dermis) creates a bluish cast visible through the skin – the Tyndall effect, caused by light scattering through the translucent gel.
Prevention: Correct injection depth – filler should not be placed in the superficial dermis.
Resolution: Dissolved with hyaluronidase.
6. Vascular Occlusion (Blocked Blood Vessel)
How common: Rare but the most serious complication of lip filler.
Why it happens: Filler is injected into or compresses a blood vessel, blocking blood supply to an area of lip tissue. The lip is one of the higher-risk areas for vascular complications due to the density of small vessels and the proximity of the superior and inferior labial arteries.
Signs: Immediate blanching (whitening) of the skin or lip, followed by a grey-purple discolouration. Increasing pain. These are emergency signs.
Prevention: Thorough knowledge of vascular anatomy. Use of cannulas where appropriate. Aspiration technique. Slow injection with small boluses. Immediate recognition of warning signs.
Resolution: This is a medical emergency requiring immediate action. Hyaluronidase must be injected immediately and in large volumes across the affected area – not waiting for confirmation, not waiting until the next day. Warm compresses, nitropaste (topical vasodilator), aspirin and monitoring. Hyaluronidase is the definitive treatment and must be available at every treatment session.
Dr. Vivek Singhal maintains hyaluronidase at every appointment and is trained in emergency vascular occlusion management. This preparedness is non-negotiable.
7. Infection
How common: Rare.
Why it happens: Bacterial contamination at injection sites. The lip area is also a common site of herpes simplex virus (cold sores), and filler treatment can trigger an outbreak in susceptible patients.
Prevention: Strict aseptic technique. For patients with a history of cold sores, prophylactic antiviral medication (e.g. acyclovir) is prescribed before treatment.
Resolution: Bacterial infections are treated with antibiotics. Herpes outbreaks are treated with antivirals. Any infection near a filler injection site should be assessed promptly — in rare cases, infection can lead to biofilm formation around the filler, which requires a different management approach.
8. Nodules and Granulomas
How common: Uncommon.
Why it happens: Late inflammatory reaction to filler — can occur months or years after treatment. Granulomas are the body’s attempt to wall off foreign material it perceives as a threat.
Prevention: Using established, well-tested HA fillers rather than permanent or semi-permanent fillers significantly reduces this risk.
Resolution: Hyaluronidase for HA fillers. Steroid injection (triamcinolone) for inflammatory nodules. In rare cases, surgical removal.
Dissolving Lip Filler: What Patients Need to Know
Hyaluronidase (sold under brand names including Hyalase and Vitrase) is an enzyme that breaks down hyaluronic acid. It is the antidote to HA filler and can dissolve product placed in the wrong location, correct migration, resolve complications or simply reverse a result the patient is not happy with.
Important facts about dissolving:
It works within 24 to 48 hours for most of the product. Full resolution of all filler may take several sessions if large volumes have been accumulated over multiple treatments.
After dissolving, the lips will return to their pre-filler state – or in some cases, may appear slightly deflated as the enzyme can temporarily affect the body’s own hyaluronic acid. This effect is temporary and the tissue recovers.
Patients can have new filler placed approximately 2 to 4 weeks after dissolving, once the hyaluronidase has fully broken down and the tissue has settled.
Dissolving is a clinical procedure and carries its own (small) risks – including allergic reaction to hyaluronidase, bruising and temporary swelling.
Who Is a Good Candidate for Lip Fillers?
The best candidates are adults who have realistic expectations and a specific, articulable goal for their lip appearance. Good general health and no active infection at the treatment site are required.
Lip fillers are not recommended during pregnancy or breastfeeding. Patients with active cold sores should wait until the outbreak has fully resolved. Patients with certain autoimmune conditions or on blood thinners should discuss their medical history fully at consultation.
What to Expect at Your Appointment
Consultation. Dr. Vivek Singhal will assess your lip anatomy, facial proportions and skin quality, discuss your goals in detail, recommend the appropriate technique and product, and set realistic expectations. You will never be pressured to proceed.
Preparation. Topical anaesthetic cream is applied for 20 to 30 minutes before treatment. The filler itself contains lidocaine, and a dental nerve block (injection around the mouth) can be offered for patients who prefer maximum comfort.
Treatment. Most lip filler appointments take 20 to 45 minutes. You will be asked to remain still and to avoid moving the mouth during injection.
Immediately after. Swelling is expected and normal. Ice packs are provided. Avoid kissing, pressure on the lips, exercise, alcohol and extreme heat for 24 hours.
Follow-up. A review at 2 weeks allows assessment of the settled result. Any touch-up or additional product is best added at this stage.
Frequently Asked Questions
How long do lip fillers last?
Lip filler typically lasts 6 to 12 months. The lips are highly mobile – the constant movement of speaking and eating means filler metabolises faster here than in other facial areas. Product choice, injection depth and individual metabolism all affect longevity.
How much filler do I need?
For most first-time patients, 0.5ml to 1ml is appropriate. Dr. Vivek Singhal’s approach is always to start conservatively. More can always be added at the 2-week review.
Will it hurt?
Topical anaesthetic is applied before treatment. The filler contains lidocaine. Most patients experience manageable discomfort – mild stinging or pressure – rather than significant pain. A dental nerve block eliminates most sensation if preferred.
Can I go back to work straight after?
Most patients can return to normal activities the same day, with the understanding that the lips will be swollen. If you have an important event, allow at least 2 weeks for the result to settle.
What if I don’t like the result?
HA filler can be dissolved with hyaluronidase. This is one of the most important features of choosing an HA filler – the result is not permanent and can be corrected.
How do I avoid the “duck lip” look?
The duck lip appearance results from too much product, incorrect placement (particularly too much in the upper lip), and migration over repeated treatments. Working with an experienced practitioner who values natural proportion over volume is the most effective prevention.
Is it safe to have lip fillers repeatedly?
Yes, with appropriate intervals between treatments. It is important to allow previous filler to fully metabolise before adding more. Building up excessive accumulated volume over multiple sessions without adequate intervals leads to migration and an unnatural appearance. Some practitioners recommend periodic dissolving and “starting fresh” to maintain optimal results.
Book Your Lip Filler Consultation
The difference between a beautiful lip result and an obvious one comes down entirely to the skill, knowledge and aesthetic judgement of the practitioner. If you are considering lip fillers and want to understand exactly what is achievable for your face, the first step is a consultation with Dr. Vivek Singhal.
Dr. Vivek Singhal — 09 Clinic
Book your consultation at www.drviveksinghal.com
All treatments described are performed by Dr. Vivek Singhal, a qualified medical professional. Individual results and experiences may vary. This article is intended for educational purposes and does not constitute medical advice.